
When you are working with Visual Machines (VMs) and fixed hard disks it can happen that you run out of space. In such cases it comes in handy that you can simply extend the existing virtual hard disk. Since Windows Server 2012R2 and Windows 8.1 this is even possible while the VM is running. After extending the VHDX you just need to go into Disk Management and expand your partition. That’s the theory at least. However in a non lab environment things might look a little different.
Primary Partition blocked by Recovery Partition
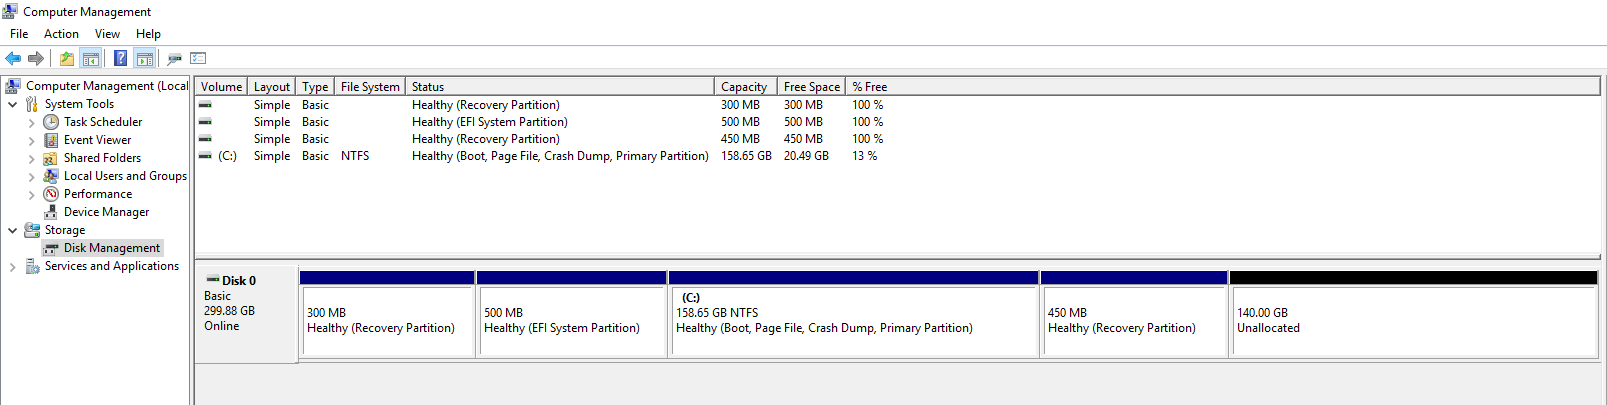
More often than not, the partition you want to extend is blocked by a Recovery Partition. Blocked because you can only extend your existing partition with unallocated space directly to the right of the partition you want to extend. In our case there is a recovery partition in between and therefor the primary partition (C:) cannot be extended. This happens because Windows 10 creates the recovery partition after your primary partition so it can easily be extended.
Windows Partition Layout
The Windows 10 UEFI parition layout looks like the following. First comes a System Partition containing the master boot record (MBR). Without the system parition you will not be able to start Windows. Follwing the system partition you have the Microsoft Reserved Parition (MSR) that manages the partitions itself. Then you have your primary Windows parition followed by the recovery parition containing tools and data to recover your Windows installation in case of failures.

Windows 10 UEFI Paritions
Deleting the Recovery Partition
We can go ahead and delete the recovery partition to make room for our primary Windows Partition. You can delete the recovery parition with DISKPART using the following commands from an admin commandline.
C:\Windows\System32\> DISKPART

DISKPART> rescan

Please wait while DiskPart scans your configuration...

DiskPart has finished scanning your configuration.

DISKPART> list disk

 Disk ### Status Size Free Dyn Gpt
 -------- ------------- ------- ------- --- ---
 Disk 0 Online 300 GB 0 B *

DISKPART> select disk 0

Disk 0 is now the selected disk.

DISKPART> list part

 Partition ### Type Size Offset
 ------------- ---------------- ------- -------
 Partition 1 Recovery 300 MB 1024 KB
 Partition 2 System 500 MB 301 MB
 Partition 3 Reserved 128 MB 801 MB
 Partition 4 Primary 298 GB 929 MB
 Partition 5 Recovery 451 MB 299 GB

DISKPART> select part 5

Partition 5 is now the selected partition.

DISKPART> delete partition override

DiskPart successfully deleted the selected partition.
Now we can go ahead and extend our Windows Parition to consume the free space. You should however leave about 500MB room so we can recreate our recovery parition.
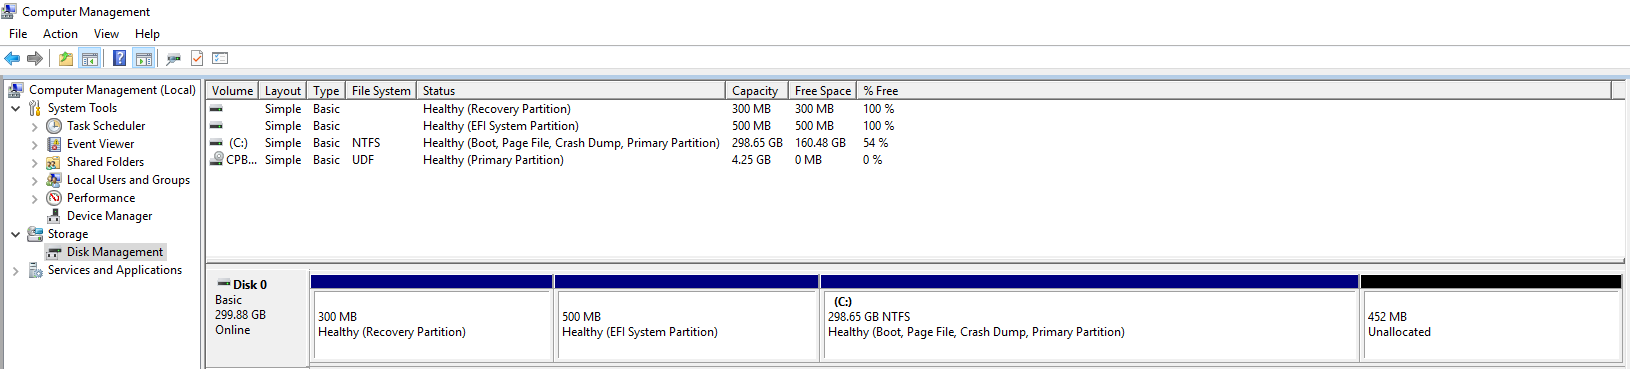
Expanded Windows Partition
Recreating the Recovery Partition
If you do not need your recovery environment you can stop here and enjoy your new disk space. However I highly recommend recreating the just deleted recovery enviroment. That way in case of a system failure you can easly troubleshoot and restore your system. To create a new recovery partition we first must format the remaining 500MB free space accordingly. Windows recognizes the recovery partition by the static unique id de94bba4-06d1-4d40-a16a-bfd50179d6ac and the GPT attribute bit 0x8000000000000001.
DISKPART> create part primary

DiskPart succeeded in creating the specified partition.

DISKPART> format quick fs=ntfs label="Recovery tools"

100 percent completed

DiskPart successfully formatted the volume.

DISKPART> assign letter="R"

DiskPart successfully assigned the drive letter or mount point.

DISKPART> set id="de94bba4-06d1-4d40-a16a-bfd50179d6ac"

DiskPart successfully set the partition ID.

DISKPART> gpt attributes=0x8000000000000001

DiskPart successfully assigned the attributes to the selected GPT partition.

DISKPART> list volume
DISKPART> exit
We now have a partition that can host the Windows Recovery Environment (WinRE). In the next step we are going to extract the WinRE from the Windows Installation media and copy it to the just created volume.
Extrating the Windows Recovery Environment (WinRE)
Download the .ISO image for your version of Windows our insert your installation disk and mount it by right clicking the image. We are now going to mount the installation files and copy the winre.wim file from Windows PE. Open an admin powershell and enter the following commands.
PS C:\Windows\System32> md C:\WinPE

PS C:\Windows\System32> md C:\WinPE\mount

# Copy install.wim from the mounted installation media
PS C:\Windows\System32> copy D:\sources\install.wim C:\WinPE\

# Mount the image in readonly mode
PS C:\Windows\System32> dism /mount-wim /wimfile:C:\WinPE\install.wim /index:1 /mountdir:C:\WinPE\mount /readonly

# Extract the Windows Recovery Environment
PS C:\Windows\System32> copy C:\WinPE\mount\Windows\System32\Recovery\Winre.wim C:\WinPE\

# Unmount the image
PS C:\Windows\System32> dism /unmount-wim /mountdir:c:\WinPE\mount /discard</pre>

## Installing the Windows Recovery Enviroment (WinRE)

Now that we have the WinRE image we can install it in our new recovery volume (R:). We are going to copy the image and then tell Windows were to find it.

<pre>PS C:\Windows\System32> md R:\Recovery\WindowsRE

PS C:\Windows\System32> copy C:\WinPE\Winre.wim R:\Recovery\WindowsRE\

# Register the recovery image
PS C:\Windows\System32> C:\Windows\System32\reagentc /setreimage /path R:\Recovery\WindowsRE /target C:\Windows
Directory set to: \\?\GLOBALROOT\device\harddisk0\partition5\Recovery\WindowsRE

REAGENTC.EXE: Operation Successful.
Thats it. We are all done and you can now use your recovery enviroment as before.